Rustic Cherry Tart (Easy Cherry Galette)


This post may contain affiliate links. Please read my disclosure policy.
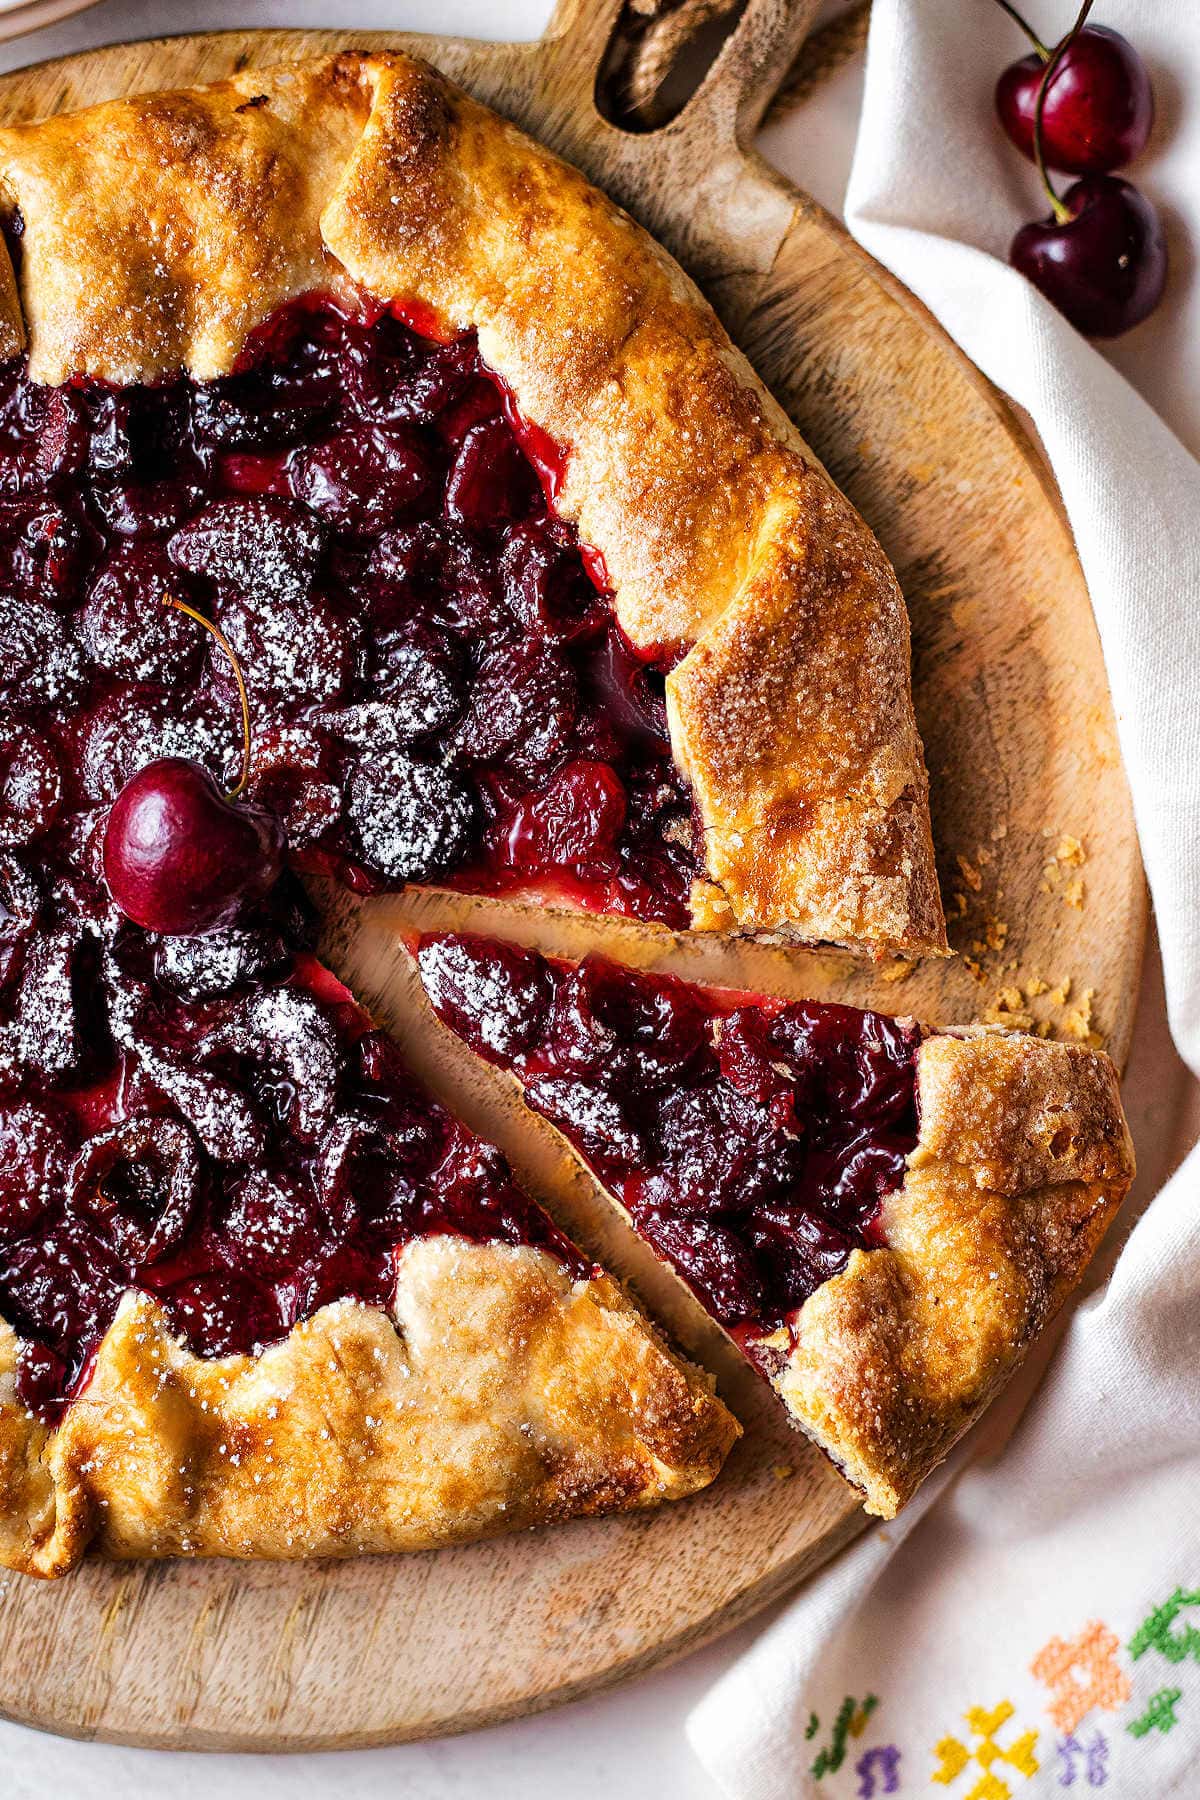
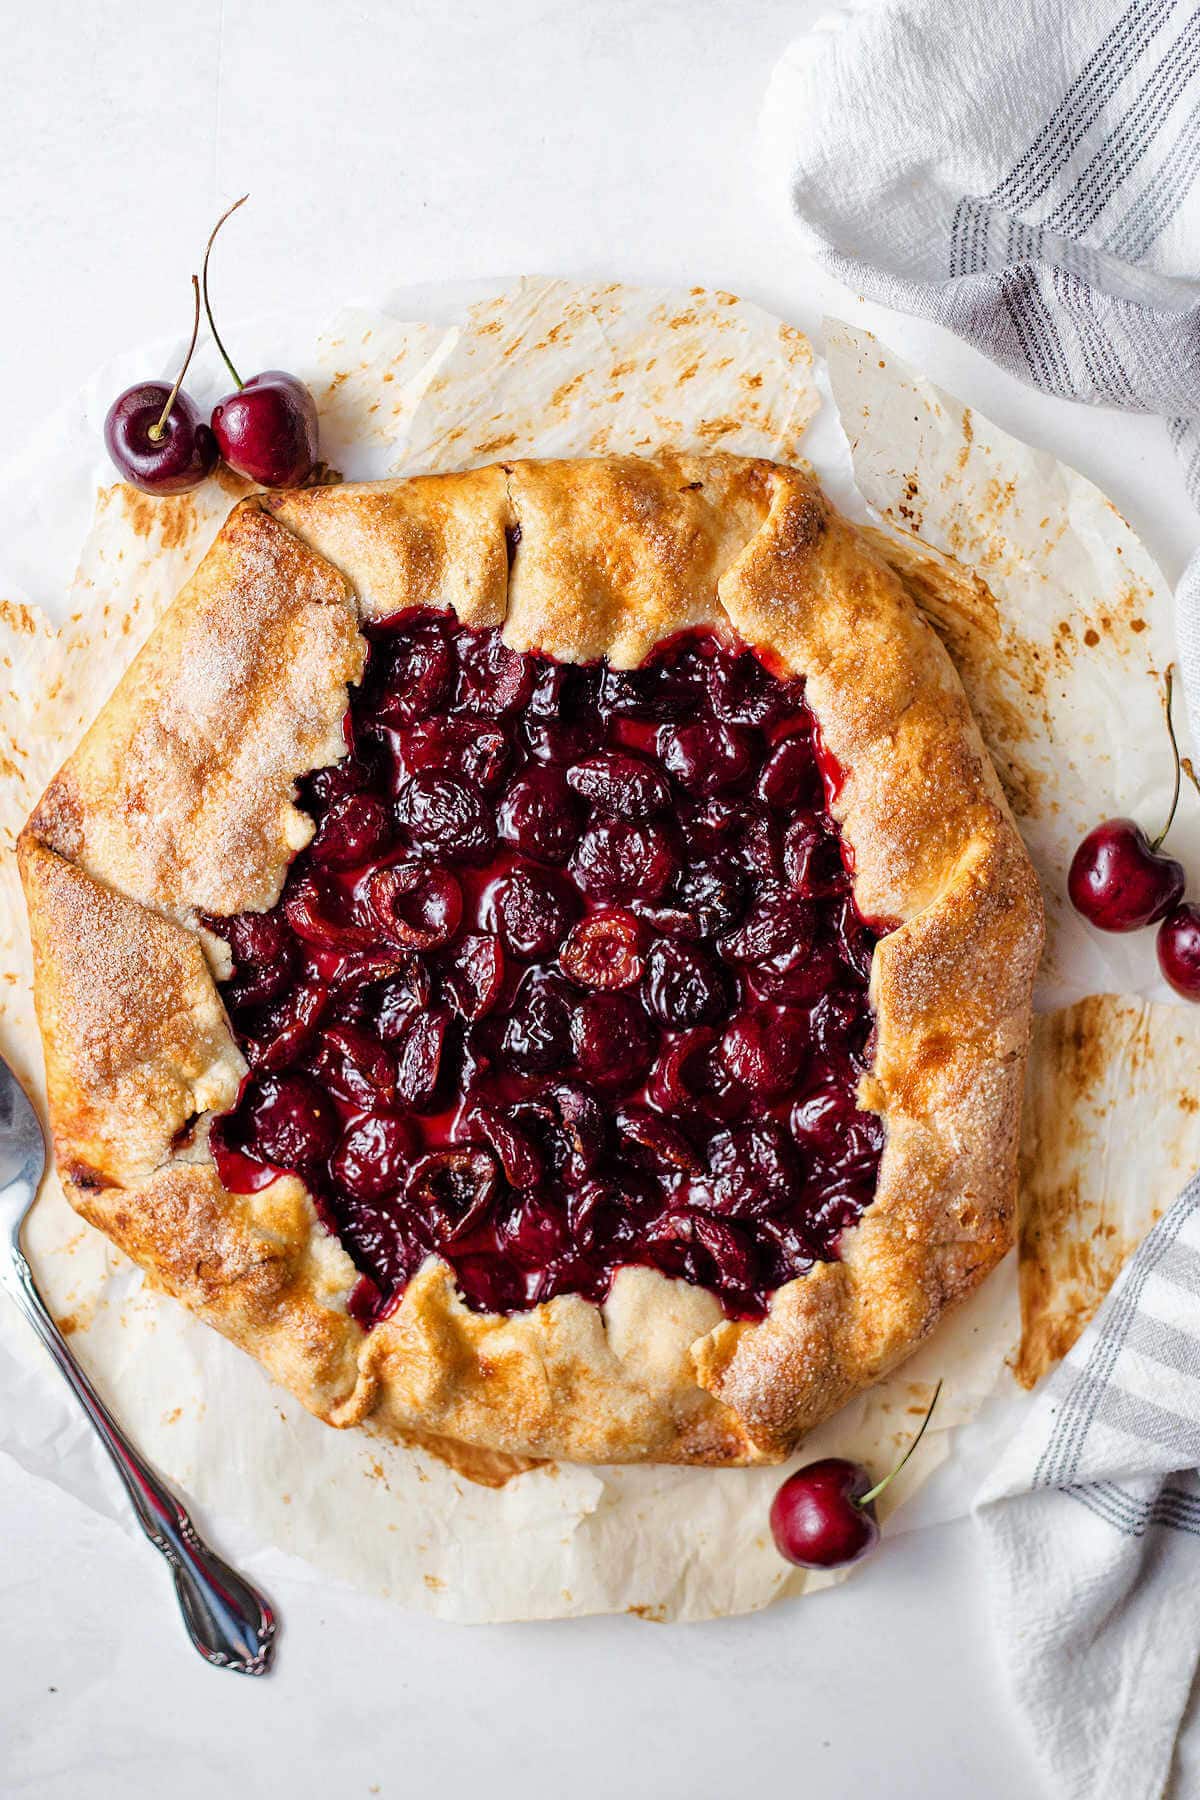
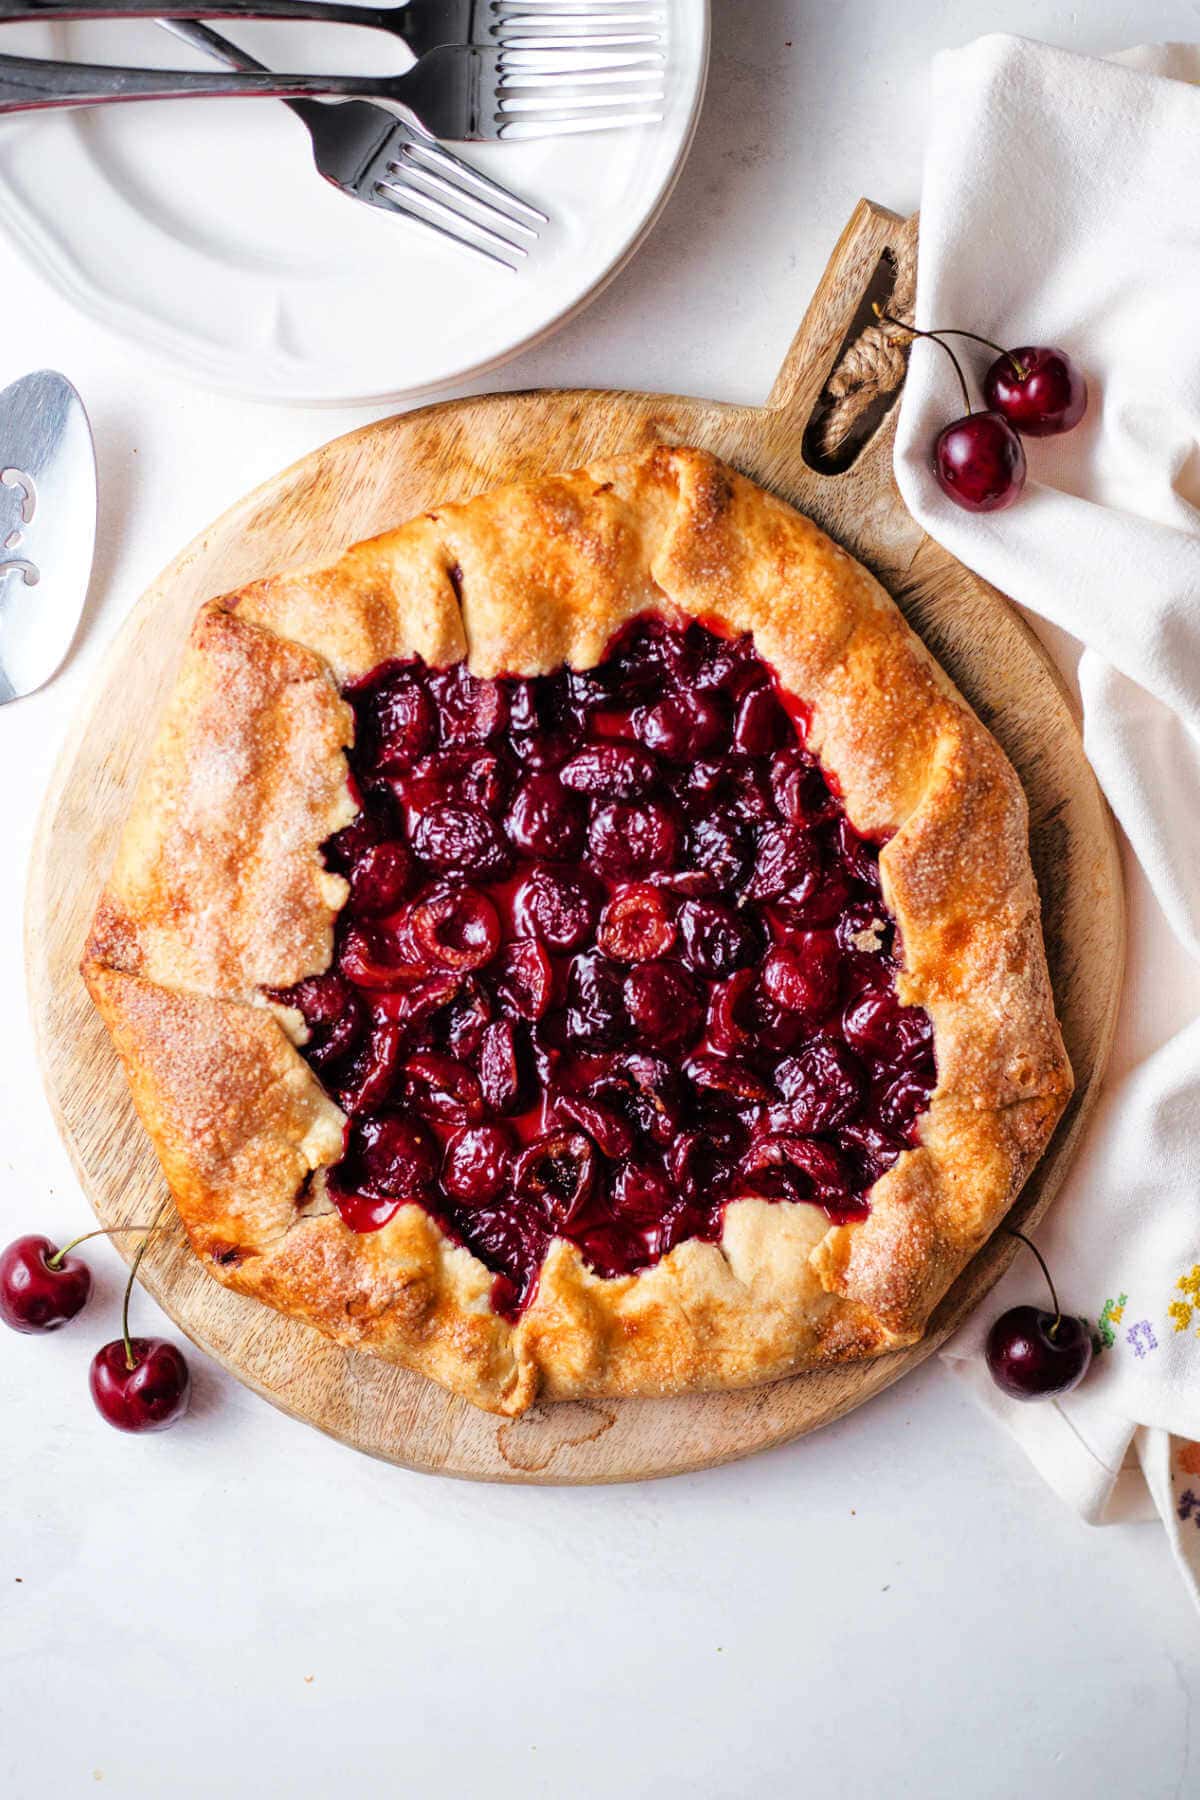
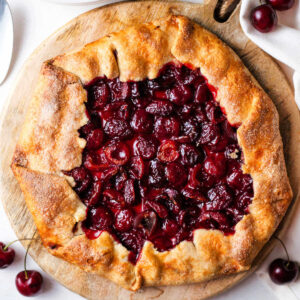
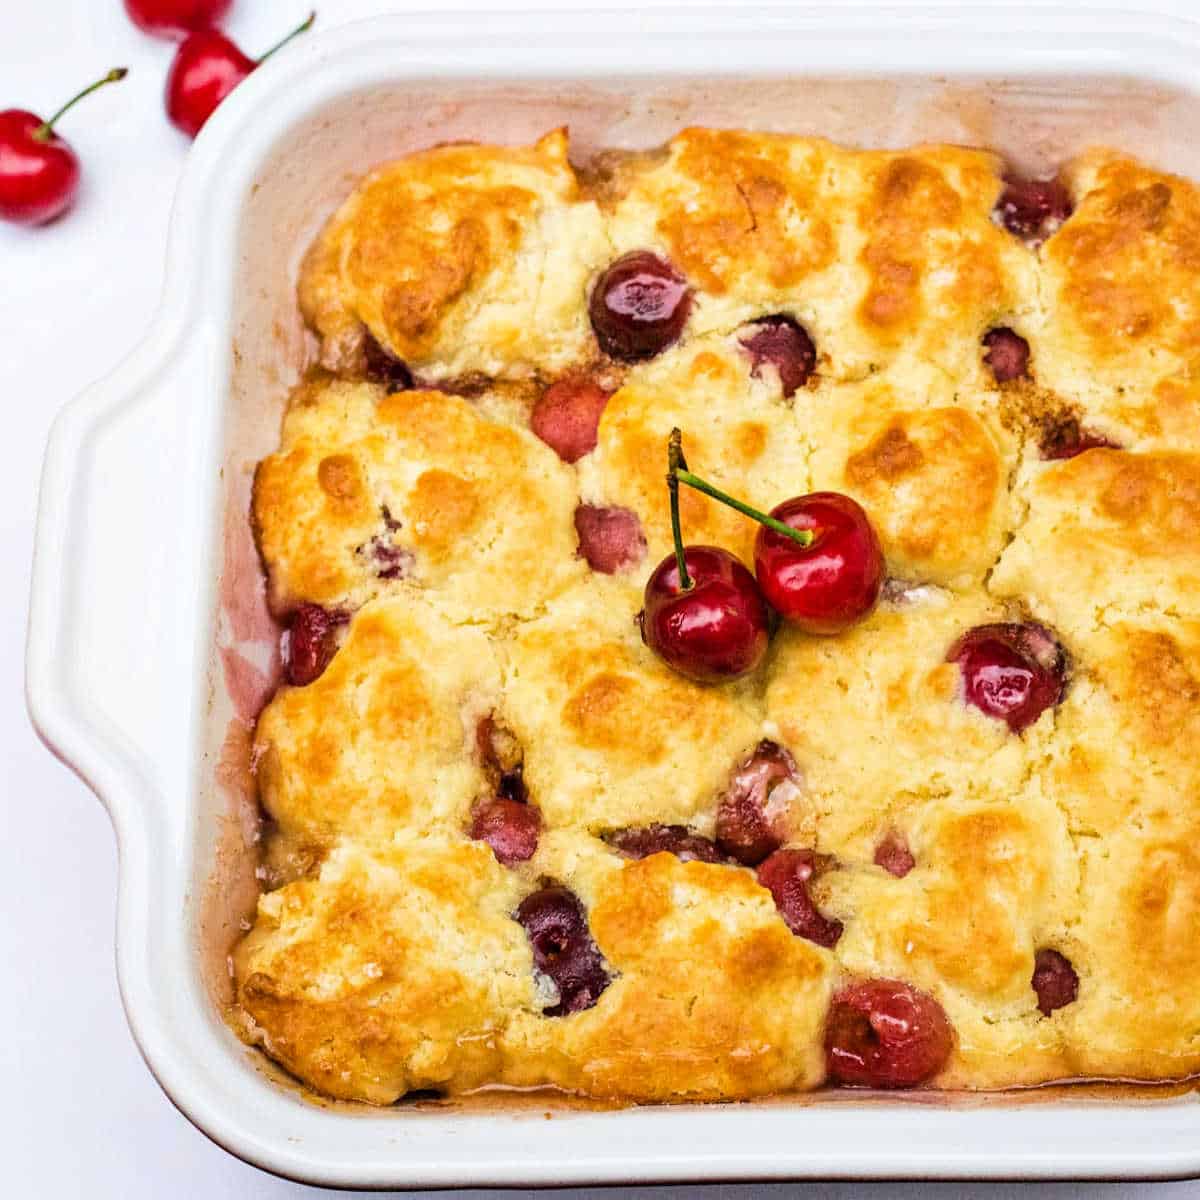
This Rustic Cherry Tart is the perfect way to show off summer’s sweetest fruit in a beautifully simple dessert. It’s made with flaky homemade pastry, a layer of juicy cherries, and a touch of sugar. No need for a pie dish, this free-form galette bakes right on a sheet pan!
Sheila’s Recipe Snapshot
I’m in love with summer fruit pies, especially free-form rustic tarts, also known as galettes. You can make them with homemade or refrigerated pie dough. The best part is there’s no fuss trying to fit the crust into a pie pan, and you don’t have to worry about making perfectly crimped edges.
With this Rustic Cherry Tart recipe, you simply roll out the dough, layer on the filling, and fold the dough over the fruit and bake. Truly, it is easy as pie!
Whoever coined that phrase must have known about my favorite 5-minute pie dough! (Minus the chilling time, of course.)
You don’t have to be a pastry chef or expert at forming perfect pie crusts because the free-form crust is what makes this tart rustic — and charming, too, right? Fresh sweet Bing cherries in a buttery crust — how can you beat that?
Ingredient Notes for Rustic Cherry Tart
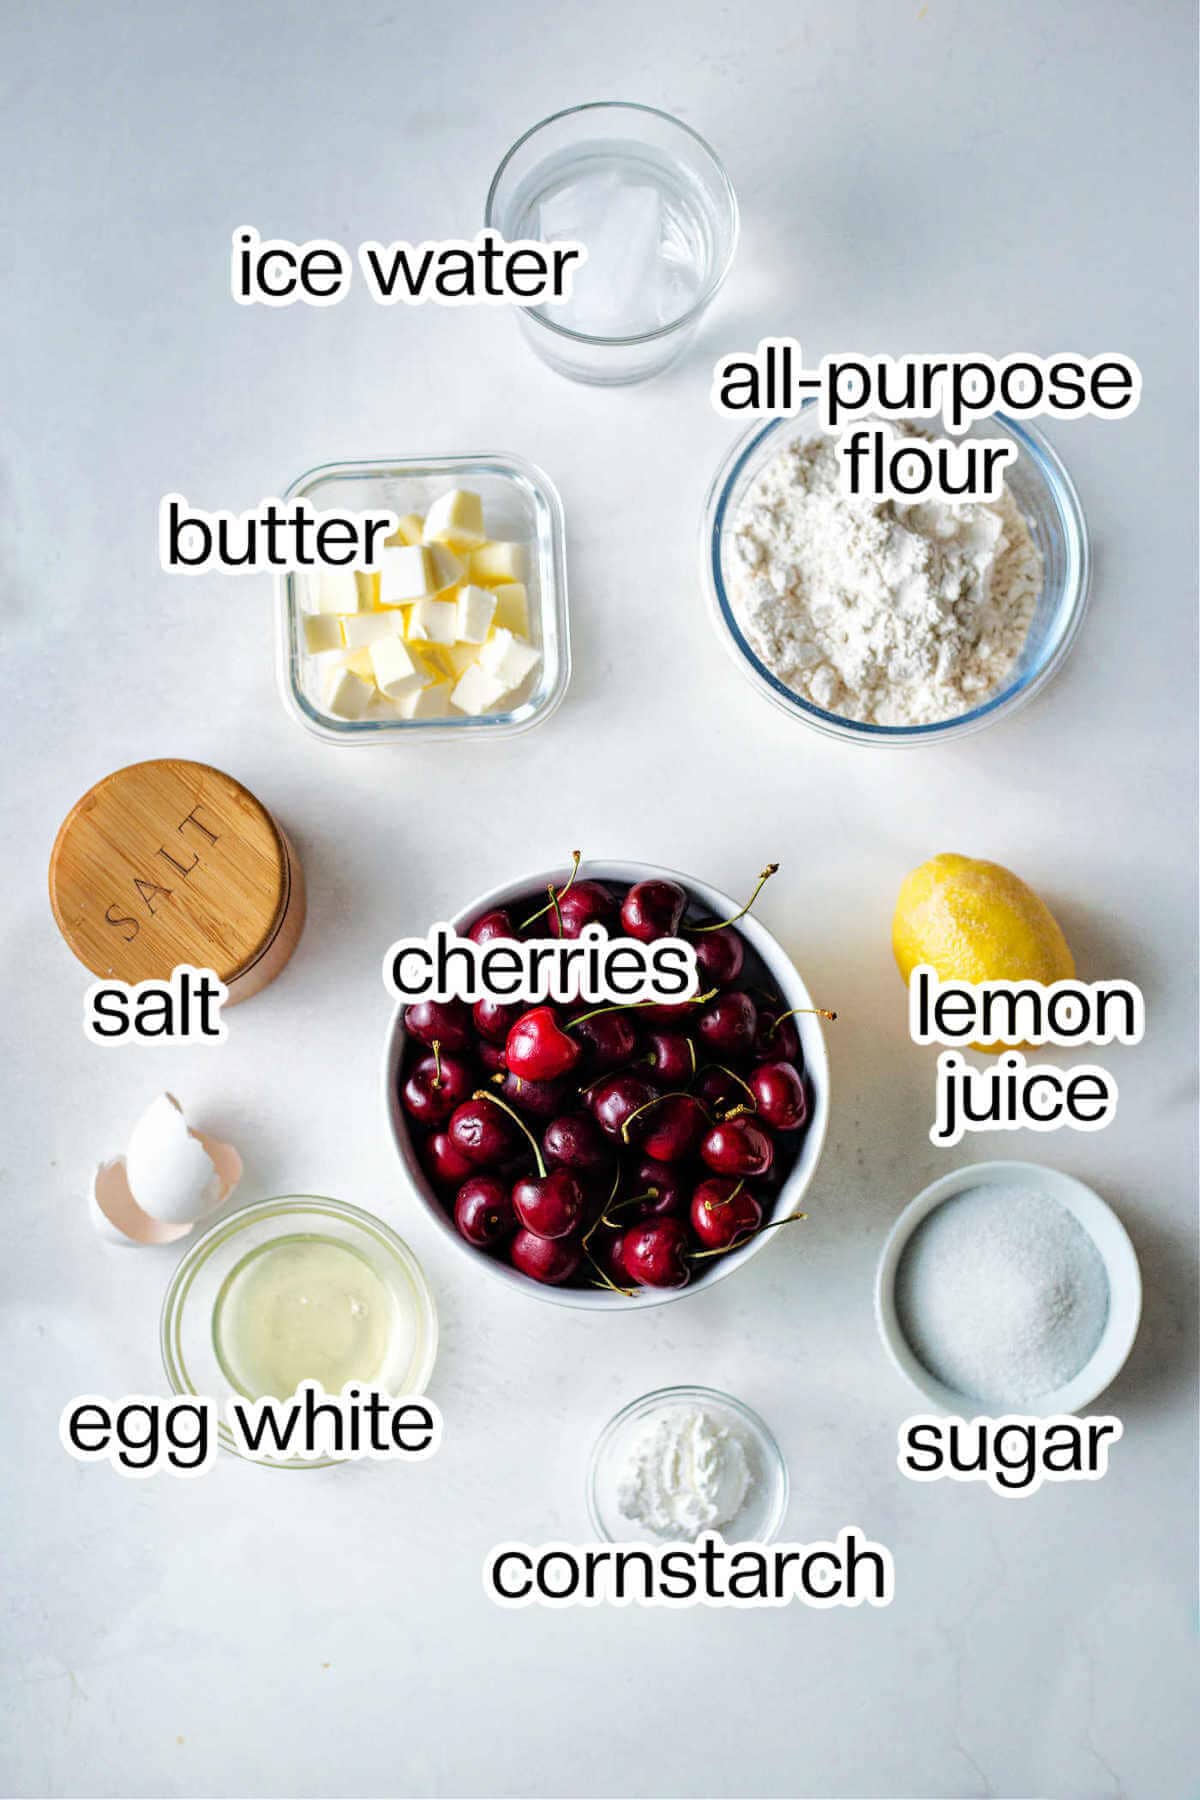
- All-purpose Flour | The base for a flaky, tender crust.
- Salt | Enhances the flavor of the dough.
- Sugar (in dough) | Adds just a hint of sweetness to balance the crust.
- Cold Butter | Essential for flaky layers! Keep it cold so it steams and puffs in the oven.
- Ice Water | Helps bind the dough without melting the butter.
- Sweet Cherries | Fresh summer cherries like Bing or Rainier are best. Pit and halve them for even cooking.
- Sugar (in filling) | Draws out the cherries’ juices and adds sweetness.
- Cornstarch | Thickens the filling so it’s not too runny after baking.
- Fresh Lemon Juice | Brightens the fruit and balances the sweetness.
- Egg White + Water | Helps the crust brown evenly and adds shine.
Variations and Substitutions
- Cherries: Use tart cherries and increase the sugar to ½ cup for a more tangy-sweet profile.
- Filling: Try a mix of berries or stone fruit, like peaches or plums, for a seasonal twist.
- Pie Crust: Swap the homemade crust for store-bought pie dough to save time.
- Gluten-Free: For a gluten- free cherry tart, use a gluten-free all-purpose flour that has a 1:1 ratio.
- Egg Wash: Brush the crust with cream or milk instead of egg wash for a different finish.
How to Make A Rustic Cherry Tart
This tart is simple, rustic, and lets sweet summer cherries shine—no fancy pie plate needed!
STEP 1 | Make the pie dough
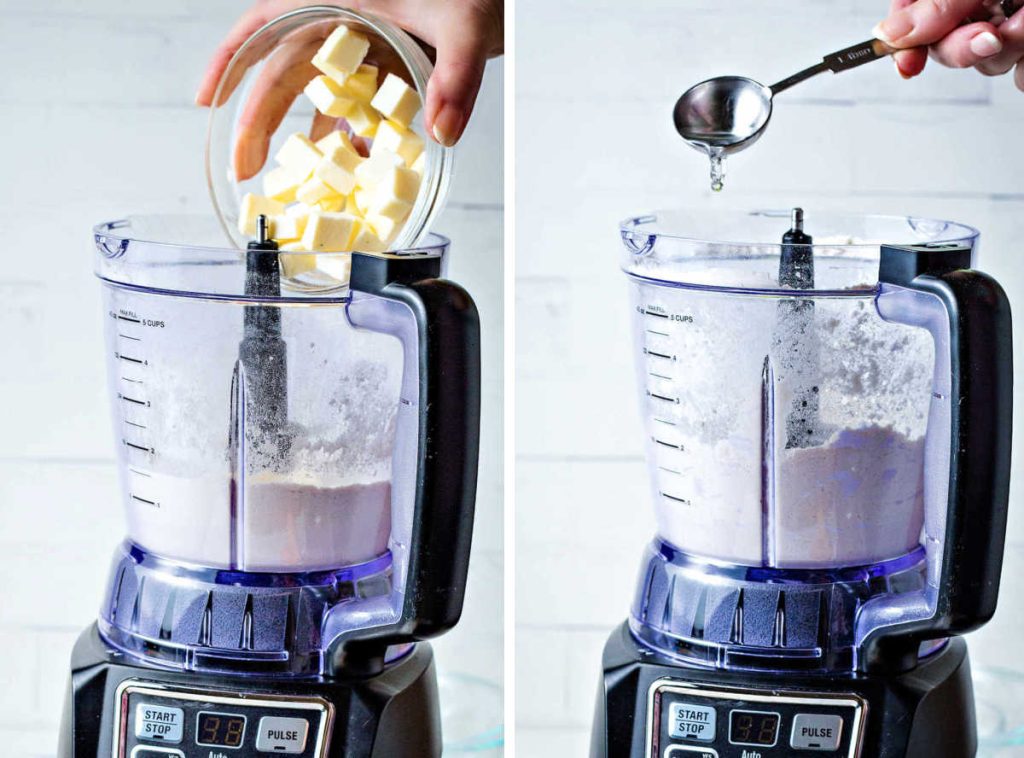
Place flour, salt, and sugar into a food processor and pulse a few times until blended. Sprinkle the butter over the top and pulse just until the butter is slightly broken into the flour but still in visible pieces. Sprinkle the ice water over the flour mixture and process just until the mixture starts to come together.
STEP 2 | Chill the dough
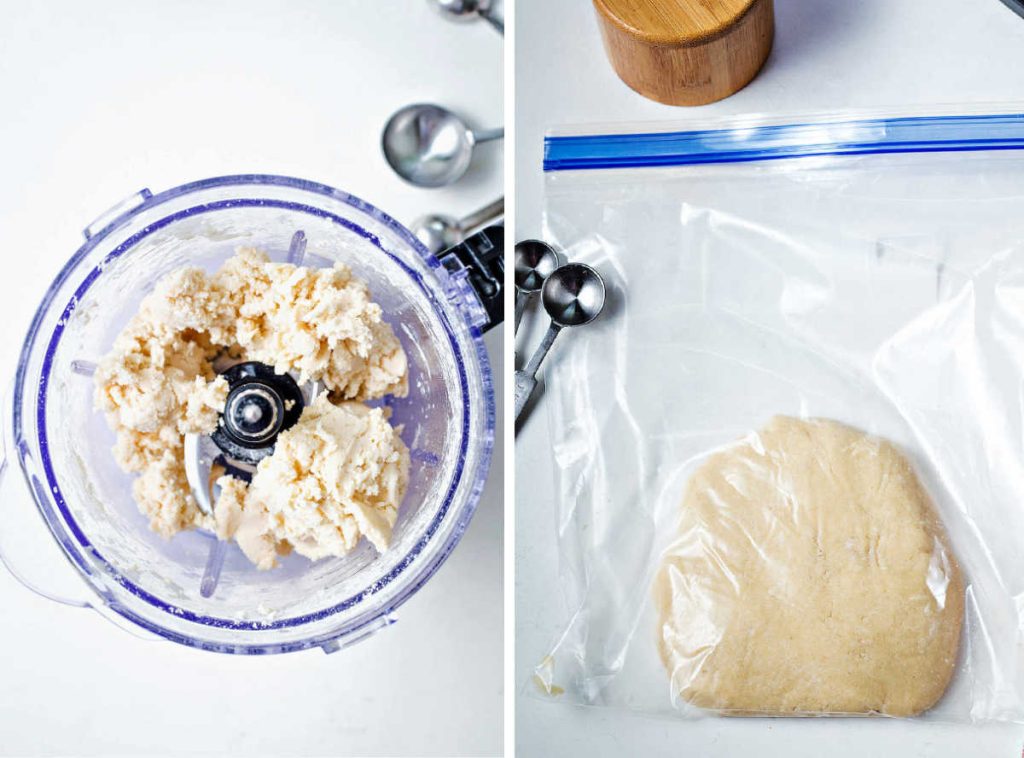
Dump the dough into a gallon-size lock-top plastic bag, and press into a flat disk. Refrigerate for 30-60 minutes before rolling out the tart.
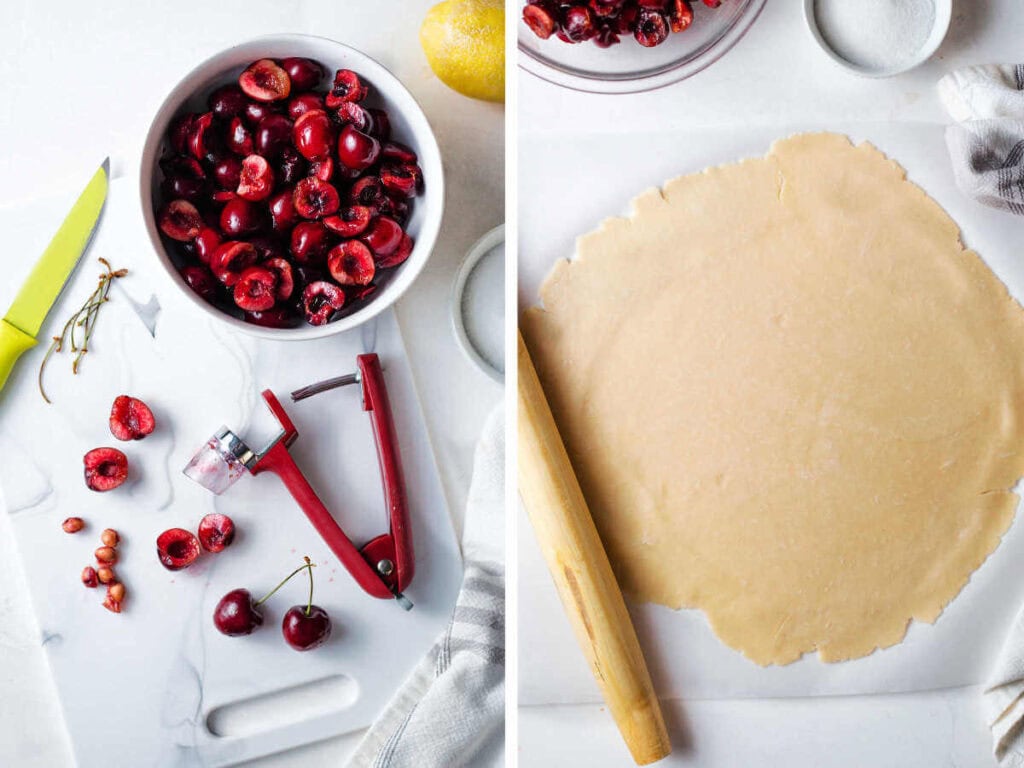
STEP 3 | Pit the cherries and roll out the dough
Roll the dough out onto a lightly floured piece of parchment paper, into a 14-inch circle. Transfer the parchment and dough onto a baking sheet.
Save This Recipe
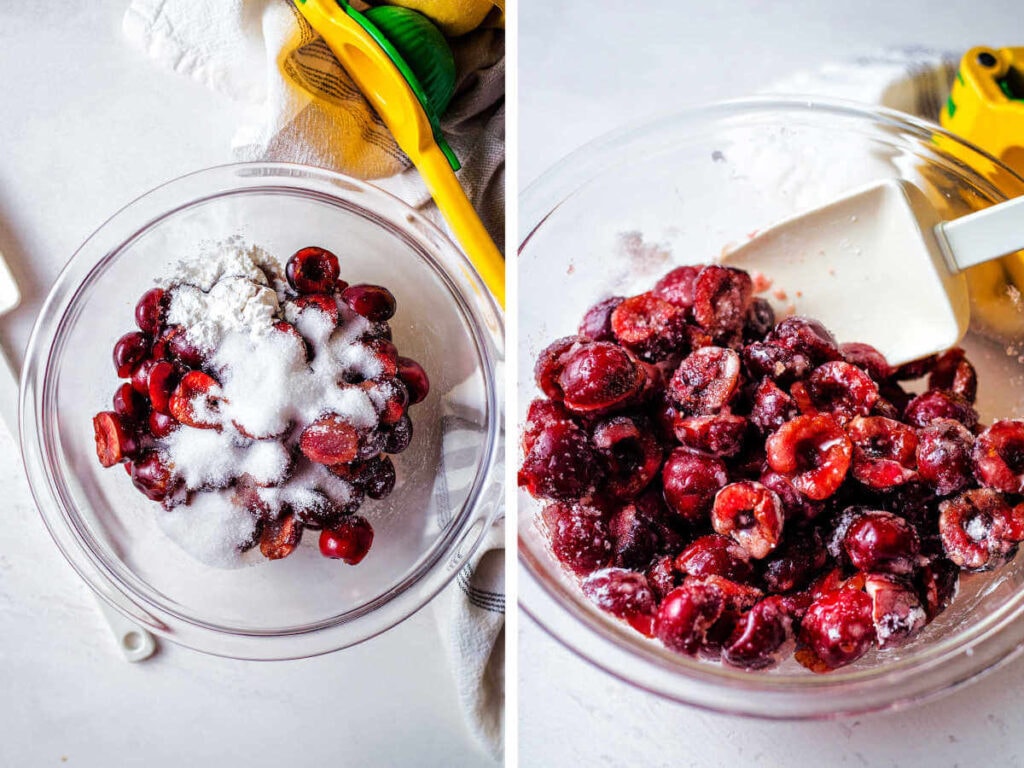
STEP 4 | Prep the cherry filling
Pit and slice the cherries in half. Place in a large bowl and toss with 1/3 cup sugar, cornstarch, and lemon juice until evenly coated. Pour fruit onto the center of the dough and spread out to within 2 inches of the edge.

STEP 5 | Assemble
Fold up the edges over the fruit. Make an egg wash by whisking together the egg white and 1/2 teaspoon water with a fork. Brush the pastry with the egg wash and sprinkle evenly with 1/2 tablespoon sugar.
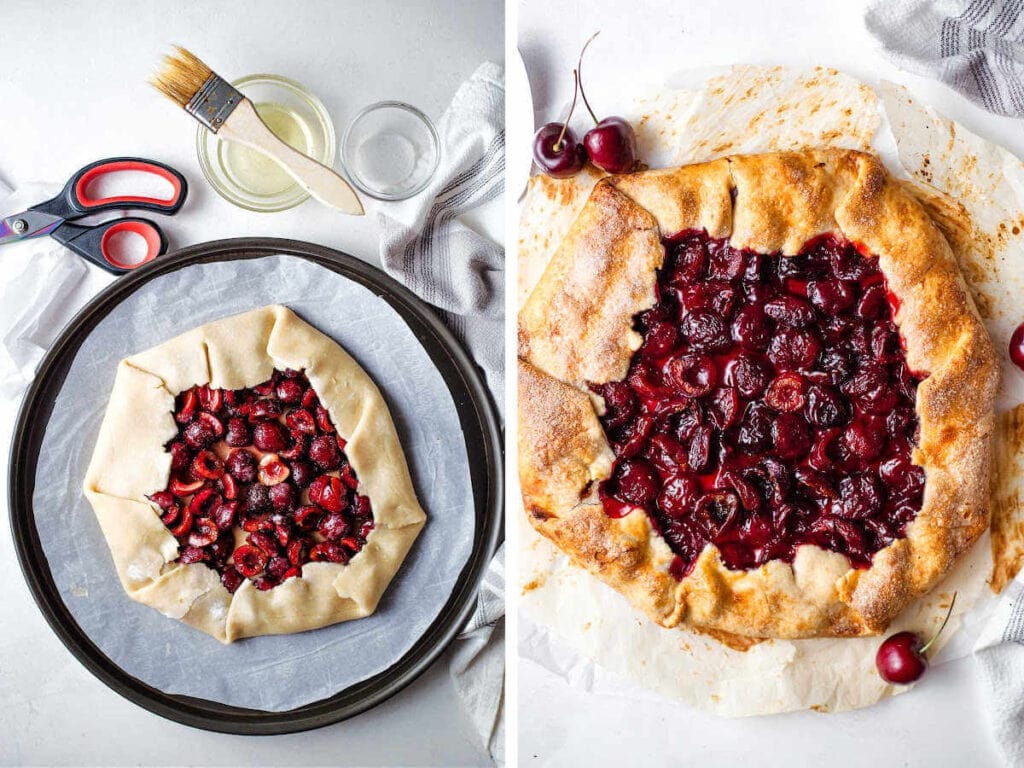
STEP 7 | Bake
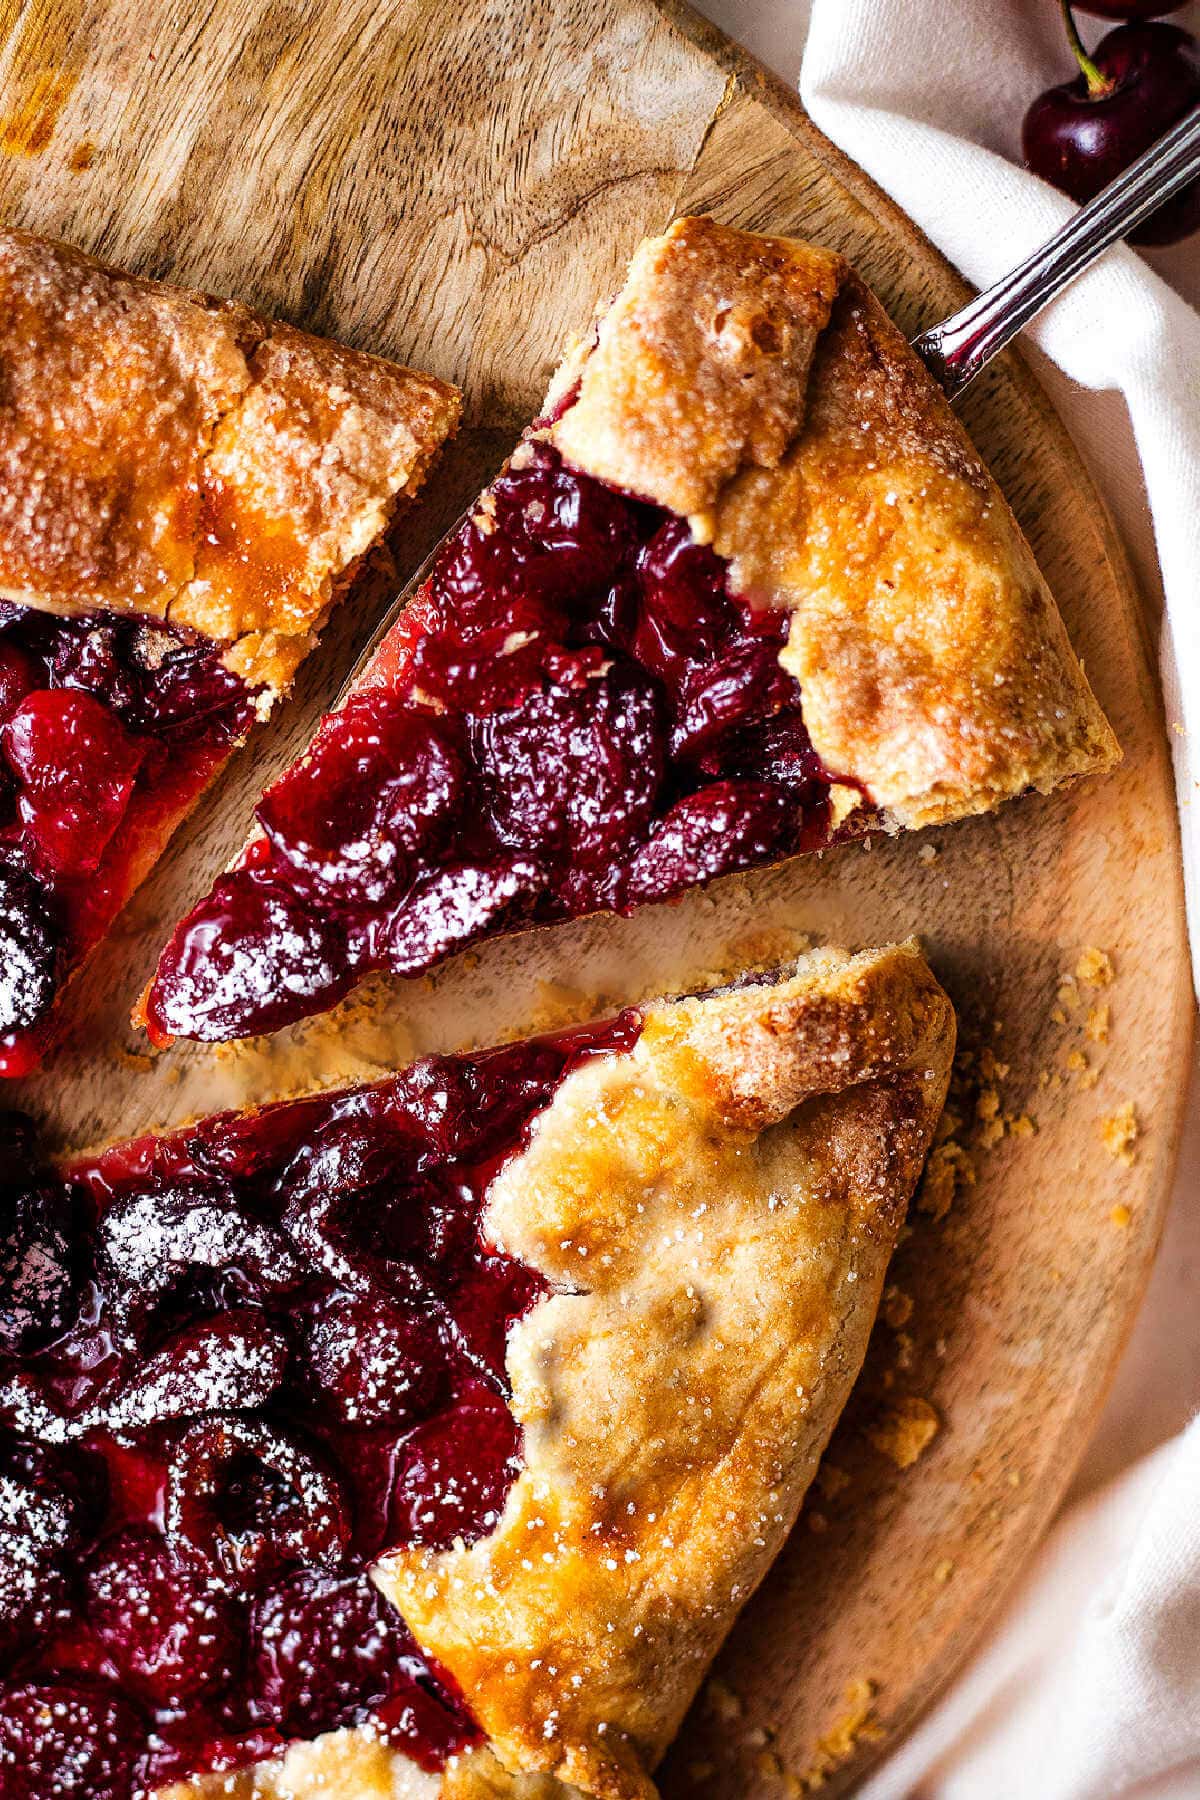
Bake at 375°F for 1 hour, or until the filling is bubbly and the crust is golden brown. Cool completely before slicing.
Recipe Success Tips
Storage and Reheating Tips
- Refrigerator: Place the tart in an airtight container or wrap it tightly with plastic wrap and store in the fridge for up to 4 days. The crust will soften slightly but still tastes great.
- Freezer: You can freeze the fully baked tart! Wrap it in plastic wrap and then foil, or place in a freezer-safe bag. Freeze for up to 2 months. To serve, thaw overnight in the fridge and warm in a 300ºF oven until crisped and heated through.
- Reheating: To refresh slices, place them in a 300ºF oven until the crust is crisp again. Avoid microwaving since it can make the crust soggy.
Frequently Asked Questions
My favorite cherries for this recipe are fresh Bing sweet cherries. They don’t require a lot of extra sugar which means the filling doesn’t get too watery and make the crust soggy.
Also, don’t add the sugar to the fruit until JUST before you’re ready to assemble the tart to avoid extra juices releasing.
Yes, but thaw and drain them well before using. You may also need to increase the cornstarch slightly to account for extra moisture.
No, you can make it by hand using a pastry cutter or two forks. Just work quickly to keep the butter cold and avoid overmixing!
Looking for More Summertime Dessert Recipes?
This easy strawberry cobbler and my blueberry shortcake recipe are both family favorites. I have a yummy cherry bread recipe, too!
What to Serve With Cherry Galette
This rustic cherry galette is delicious served plain, but even better with a scoop of vanilla ice cream or a dollop of whipped cream. You can also try it with lightly sweetened Greek yogurt or crème fraîche!
Love this recipe? Bookmark it for the future!
Simply tap the heart symbol located in the lower right corner of your screen, and the recipe will be securely stored in your own recipe box.
Rustic Cherry Tart (Easy Cherry Galette)
Ingredients
Cherry Filling
- 1 lb. sweet cherries ~ 3 cups – halved and pitted
- ⅓ cup sugar
- 1 tablespoon cornstarch
- 1 tablespoon fresh lemon juice
Finishing
- 1 egg white
- ½ teaspoon water
- ½ tablespoon sugar
Pie Dough
- 1- ¼ cups all-purpose flour
- ¼ teaspoon salt
- ½ teaspoon sugar
- 7 tablespoons cold butter cut into cubes
- 5 tablespoons ice water (plus more if needed
Instructions
- Roll the dough out onto a lightly floured piece of parchment paper, into a 14 inch circle. Transfer the parchment and dough onto a baking sheet.
- Pit and slice the cherries in half. Place in a large bowl and toss with the 1/3 cup sugar, the cornstarch and lemon juice until evenly coated. Pour fruit onto the center of the dough and spread out to within 2 inches of the edge.
- Fold up the edges over the fruit. Make an egg wash by whisking together the egg white and 1/2 teaspoon water with a fork. Brush the pastry with the egg wash and sprinkle evenly with 1/2 tablespoon sugar.
- Bake at 375 degrees for 1 hour, or until filling is bubbly and crust is golden brown. Cool completely before slicing.
Pie Dough
- Place flour, salt, and sugar into a food processor and pulse a few times until blended. Sprinkle the butter over the top and pulse just until the butter is slightly broken into the flour but still in visible pieces. Sprinkle the ice water over the flour mixture and process just until the mixture starts to come together.
- Dump the dough into a gallon-size lock-top plastic bag, and press into a flat disk. Refrigerate for 30-60 minutes before rolling out the tart.
Notes
Nutrition
Life Love and Good Food does not claim to be a registered dietician or nutritionist. Nutritional information shared on this site is only an estimate. We recommend running the ingredients through an online nutritional calculator if you need to verify any information.

Can this be frozen after baking?
Lisa, I wouldn’t recommend freezing this tart as the texture will change.
We make this with store bought crust and usually only have access to frozen cherries. My kids don’t usually like anything with cooked cherries, but they love this. We have made it several times now. A family favorite.
I’m thrilled with the results of this crust! I was worried because all the other recipes called for shortening, but that’s not something I keep on hand. I had already made the filling (coincidentally the recipe I use is almost EXACTLY like urs; same ingredients, same process, just slight variation on the amounts) but I’ve always used puff pastry (with varying degrees of disappointment). this was my very first homemade crust and it turned out EXCELLENT! I made six tartlets in a muffin tin and one medium sized one (baked it on a cookie sheet). I used frozen butter and I did pop each completed item in the freezer for a few minutes before baking, and I was SO happy with the results. Thanks! I’ll be using this again for sure.
Trusted & tried with thawed, drained cherries…filling mixture was a little watery, but this can be solved by transferring cherries by spoon instead of pouring filling straight from the bowl.
So happy that pie crust and construction was incredibly newbie friendly ! Will definitely be making this again 🙂
p.s. really enjoy the way lemon cuts through the sweetness of the cherries.
Thank you !
Can the dough be made by hand or do you need a food processor?
Also- can flour be used as a replacement for the cornstarch?
Yes, you can use flour instead of cornstarch.
Tashi, using a food processor is the EASIEST way to make this pie dough, however, you can also cut the butter into the flour with a pastry blender or a fork.
The juice from cherries flowed out of the pastry….I did use the 1 tablespoon of cornstarch ,lemon and sugar as specified……maybe cherries were too juicy? Tasted good but pretty messy……
Carol, this recipe would probably work best with “just ripe” cherries — glad you still enjoyed the taste!
One has to be quite careful assembling the crust because if there’s any break in the rim, all the juice will flow out (as happened in my first attempt). What I did to resolve this was to take the juice that had run out, quickly put it in a bowl in the microwave and heated at on high for 30 second bursts to thicken it up then poured it back over the cherries.
We made this yesterday with fresh yellow and red cherries that we picked the same day. It was incredible!!! We used Dufour Pastry Dough instead of making from scratch – but followed your filling recipe. My husband said its the best thing I’ve ever cooked. It was also so easy to make and so simple that the cherries were highlighted when eating. Thanks for the recipe – we will be making this again!
Lauren, soooo very glad you enjoyed the recipe! Cherry pie with fresh cherries really is the best!
The body of the recipe says “cherry blueberry filling” but there aren’t any blueberries in the ingredient list. Was that a “typo?”
This tart looks perfect. Simple to make and wonderful. I bought cherries that I halved, pitted and froze. If I thawed my cherries do you think they would work to make this tart? I’m hoping so. Your thoughts about using thawed frozen cherries would be very much appreciated. Thanks … Linda
Linda, I’m planning on freezing some cherries this week (while they are still on sale) and am planning on using them for tarts later as well. I haven’t tried the recipe with frozen cherries yet, but I would plan to drain the cherries after they thaw to remove any excess liquid. If you do try it, please let me know how it works for you. Enjoy and Happy 4th!
My plans are for over the weekend too. Just love how simple and wholesome this recipe is. Just doesn’t get any better! Happy 4th and Happy Cooking!!
i love cherries. it looks so good!
Thanks, Dina. Let me know if you try this recipe and come back here to rate it, too! Happy 4th!
So glad you liked the recipe! Annnnnnnd your tart looks even better than mine!! xx
Oh, thank you, Katrina! I did really like it…so much so that I’ll be making another one this weekend 🙂